Setting Out Herringbone Wall Tiles

24 Cool Collection Herringbone Tile Layout Herringbone Tile Pattern Herringbone Tile Patterned Floor Tiles

Herringbone Installation Aspect Herringbone Tile Pattern Herringbone Tile Patterned Floor Tiles

Diy Herringbone Peel N Stick Tile Floor Diy Wood Floors Herringbone Tile Floors Herringbone Floor

Aj Mccormack And Son Setting Out Herringbone Paving Herringbone Brick Pattern Brick Patterns Brick

Pin By Wendy Chestnut Walker On Wall Paint Treatments Wood Floor Pattern Herringbone Tile Pattern Tile Layout Patterns

Your Guide To Tile Pattern Layouts Herringbone Tiles Kitchen Herringbone Tile Pattern Floor Tile Design

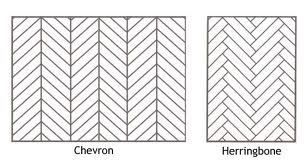
When tiling a herringbone pattern standard rule of thumb is that each rectangular tile is laid at 90 degree to the tile next to it creating what the experts refer to as a fish bone pattern that also resembles a set of arrows or triangles.
Setting out herringbone wall tiles.

Pin On How Tos

Setting Out Herringbone Paving Herringbone Brick Pattern Brick Patterns Herringbone Tile Floors

Bathroom Design Tile On Instagram Patterned Bathroom Tiles Subway Tiles Bathroom Herringbone Subway Tile

Subway Tile In A Herringbone Pattern Lemon Grove Avenue In 2020 Bathroom Shower Walls Herringbone Tile Herringbone Subway Tile

Herringbone 90 Degree Used For Walkways Paver Patterns Brick Patterns Patterned Floor Tiles

Diy Herringbone Peel N Stick Tile Floor Grace Gumption Herringbone Tile Floors Herringbone Tile Tile Countertops Diy

Setting Out Herringbone Paving Herringbone Brick Pattern Herringbone Tile Floors Herringbone Pattern
Herringbone Installation Aspect Tile Layout Herringbone Tile Pattern Herringbone Tile

Home Progress Bathroom Update Tile Patterns Sarah Sherman Samuel Tile Layout Tile Design Pattern Kitchen Backsplash Tile Designs

Subway Tile Back Splash In A Herringbone Pattern Kitchen Backsplash Tile Designs Backsplash Tile Design Herringbone Backsplash

12 X 24 Tile Two Color Herringbone Pattern Google Search Herringbone Tile Pattern Herringbone Tile Patterned Floor Tiles

I Pinimg Com Originals 38 13 28 381328265e8cb9a

30 Colorful Herringbone Tile Floor Decortez Vinyl Tile Herringbone Tile Floors Groutable Vinyl Tile

Straight Herringbone Tile Backsplash Tutorial Kitchen Wall Design Patterned Kitchen Tiles Herringbone Tile Backsplash

Excellent Tutorial On Laying A Herringbone Pattern Herringbone Brick Pattern Front Yard Landscaping Design Herringbone Pattern

Herringbone Pattern Herringbone Tile Pattern Tile Patterns Herringbone Tile

Image Result For 300x100 Tile Chevron Pattern Floor Herringbone Tile Floors Herringbone Tiles Kitchen Herringbone Tile Pattern

The Herringbone Pattern Is The Most Classic Of Tile Layouts And Is A Coveted Design Feature For Tile Layout Patterns Herringbone Tile Pattern Herringbone Tile
1

Herringbone Oak Engineered On Underfloor Heating Timber Flooring Wood Floors Flooring
History Of Herringbone Chevron Floor Chevron Tile Herringbone Floor

How To Install A Herringbone Floor Herringbone Wood Floor Herringbone Floor Diy Wood Floors

Sweet Something Designs Diy Herringbone Tile Floor Herringbone Tile Floors Tile Floor Herringbone Tile

Which Direction Should You Run Your Tile Flooring Well Designed Patterned Floor Tiles Tile Layout Tile Floor
Source : pinterest.com
